by Damien Andrews
I think you’ll find only the most remote arguments to the statement: most errors and mistakes in carpentry are directly related to poor or inaccurate measurements. It’s just the way it is – hence that old carpenter’s adage: measure twice, cut once. The mistakes wouldn’t be so noteworthy (and costly) if there were such a thing as a lumber stretcher, but unfortunately, nobody has figured out how to replace that 1/8″ that was mistakenly cut off of your piece of fine cherry stick lumber, or your ¾” thick sheet of birch desktop.
In carpentry, be it furniture building or house framing, accurate measurements begin with a quality measuring device and a good, sharp carpenter’s pencil in the hands of a knowledgeable user. Why a carpenter’s pencil instead of just one from the office desk drawer? Two reasons: 1) Unlike the softer #2 lead pencils used in normal office work, the carpenter’s pencil is available with the much harder #4 or #5 lead. This means it will not only last much longer on hard, rough wood and concrete surfaces, but also that when properly sharpened, a carpenter’s pencil can be used to ‘notch’ a measurement – an incredibly accurate way to mark a piece of lumber for cutting. 2) The oval-shaped lead in a carpenter’s pencil is many times larger than the cylinder-shaped lead in a regular pencil. Again, this facilitates many more markings and sharpenings during the life of the carpenter’s pencil.
It should be noted that traditionally styled round and polygonal office pencils do definitely have a place in the carpenter’s tool bag. They are very handy when marking centers on holes, for example. But if you’re going to have one in your tool bag, I’d heartily suggest buying one with a #4 lead. Sharpen these pencils the way you sharpen your office pencils, and use them as appropriate for your project.
Lastly, before getting into sharpening your carpenter’s pencil, I would suggest that you keep several on your jobsite or in your work area – as well as the one in your tool bag. I like to keep one at each saw and one at the drill press. This makes marking much simpler, extends the useful life of each pencil’s sharpening period, and prevents me from leaving the pencil at one of the saws – and then not having it with me when I need it at the project site.
Sharpening Your Carpenter’s Pencil
You’ll need:
- A utility knife
- A small piece of 60-80 grit sandpaper
- A small piece of 220-350 grit sandpaper
Suggested Safety Equipment:
- Leather gloves
- Safety glasses or goggles
You can get a respectable edge on a carpenter’s pencil using just a utility knife. In fact, if you sharpen a carpenter’s pencil often enough using a utility knife, you can get pretty good at it, and create a decent marking lead with minimal waste and time. But we want a perfectly sharpened carpenter’s pencil and no waste at all, so we’ll only begin our sharpening process with a utility knife.

STEP 1
Hold the utility knife in one hand and the carpenter’s pencil in the other. With the knife’s sharp edge pointing away from you, carefully whittle away the outer and inner wood of all four edges of the carpenter’s pencil you’re sharpening. Do this until you can see the tip of the lead, and the majority of the wood is gone. You’ll now have a steep angle running from the untouched part of the outer wood, to the exposed tip of the lead.
STEP 2
Now take the small piece of 60-80 grit sandpaper and lay it flat on something. Hold the carpenter’s pencil by the wood. Sand off more of the wood that houses the lead. Try not to sand too much lead at this point. Adjust the angle you’re holding the pencil at as necessary. We’re trying to remove the pencil’s protective wood casing and get down to the lead – but not to disturb the lead too much.
STEP 3
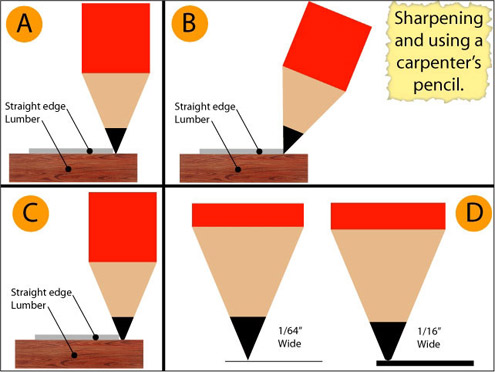
Finally, take the small piece of 220-350 grit sandpaper and lay it flat on something. Hold the carpenter’s pencil by the wood. Gently sand BOTH long edges of the lead until you achieve a long, straight, sharp lead edged “V” point. The pencil on the left side of Section “D” in the illustration is properly sharpened.
(Note: Some carpenter’s prefer that their pencils be sharpened flat on one side of the lead and steeply angled on the other. This is particularly common among furniture and cabinet makers. If you find that you prefer this kind of a lead, then only use the 220-350 grit sandpaper on ONE side of the lead.)
MAINTENANCE
Repeat Step 3 whenever the carpenter’s pencil dulls, or right before you perform any critical measuring and marking, which is quite frequently when you are making furniture or cabinets. If the lead gets too far worn down, repeats steps 2 & 3 as needed. Finally, when the lead can no longer be just sanded, grab the utility knife and repeat all three steps.
Using Your Carpenter’s Pencil
Referring to the diagram, Section A shows how NOT to hold your pencil when marking your stock, and why. Note the gap between the tip of the lead that’s contacting the stock and the lead’s angled side that’s contacting the straight edge of the square – even with a super sharp carpenter’s pencil. Section C shows how this effect is further exaggerated when the carpenter’s pencil lead is dull and rounded. While this 1/16″ – 1/64″ may not seem like much, it is. If you mark all the studs for a 30′ wall like this, by the time you get to the end of the wall you’ll be off close to an inch – maybe more. And if you’re marking a piece of costly board lumber to make a desktop, you’ll be left with a gap that will need filler – which never does fine woods justice. Hold your pencil as shown in Section B – at a slight angle, so as to get the pencil’s lead edge as close to the straight edge as possible.
You need not press hard when marking your lumber. Practice using minimal pressure and getting the marked line so close to the straight edge that you have trouble seeing it before moving the square away. As is made clear in section D, a fine line is much more accurate, and leaves much less question as to where to cut, attach or drill.
And when you’re sharpening or using your carpenter’s pencil, always remember: measure twice, cut once.


